![]()
Disclaimer: This document explains the process to get my Hermes Lite 2 working on my iMac using Windows 10 in a Virtual Machine with Parallels. Your settings will undoubtedly be different to those documented here, so please bear this in mind if you choose to follow or use this guide. Many thanks.
Version 1.01 updated 29-Jan-2024
The Hermes Lite 2 is proving to be an extremely popular, low cost SDR QRP transceiver which has recently attracted the attention of many amateur radio operators all over the globe. Damn, even my club – Newport Amateur Radio Society – are considering purchasing one.
There are a plethora of excellent articles, guides and instructions on how to get the Hermes Lite 2 configured and operational on Windows 10/11 platforms, so this guide attempts to provide insight into how to configure it on a Mac with the excellent Thetis software application (used predominantly on the Anan series of transceivers) – specifically when not dual booting to a distinct Windows instance, but when one wants to use Windows as a Virtual Machine within Parallels.
So, to be absolutely clear, specifically… this overview may be of help to those wanting to run and configure the following combination of hardware and software:
- Hermes Lite 2 amateur radio SDR transceiver
- Apple Mac computer such as an iMac, MacBookPro, MacBookAir etc
- Parallels running Windows 10 or 11 – IMPORTANT, see section below
- Thetis – main version and HL2 fork
My Hardware Specification
Performance of hardware and software will of course differ for individual computers. This is the specification of my current Mac setup.
FYI: With Thetis running, my iMac MacOS system resources run at about 37%-45% capacity, so yes... this might be a little high, but please also remember here I had Safari and a few other apps open, that the full version of Windows 10 is running in a VM, and Parallels is also running - all of these at the same time, on the same Mac.

- Hermes Lite 2 amateur radio SDR transceiver with I/O board, firmware 7.3.2, Protocol 1
- iMac;
- 40GB RAM
- 1TB internal, several SSD externals
- 3 GHz 6-Core Intel i5
- Radeon Pro570X 4GB
- MacOS – Ventura 13.5.2
- Parallels Mac Pro version
- Thetis and HL2 fork
Please note that in order to get your Hermes Lite 2 recognised on your home network, you will need Parallels for Mac Pro version, NOT the standard version. The pro version is, as of the date of this guide, only available as an annual subscription at a price of £99yr. Explanation of why this is needed is further down this guide.
Software Installation and Configuration

Installation of Thetis software is straightforward: simply follow the instructions by Rick Langford N8SDR which can be found as a downloadable and regularly updated pdf in the files section of the Hermes Lite 2 Facebook page. In summary, there are two file downloads needed. First download and install the main Thetis application by Richie, MW0LGE, then download and install the HL2 fork of Thetis into a new directory. Ricks instructions in the linked document are very clear and there’s no need to go in to further detail about that process here.
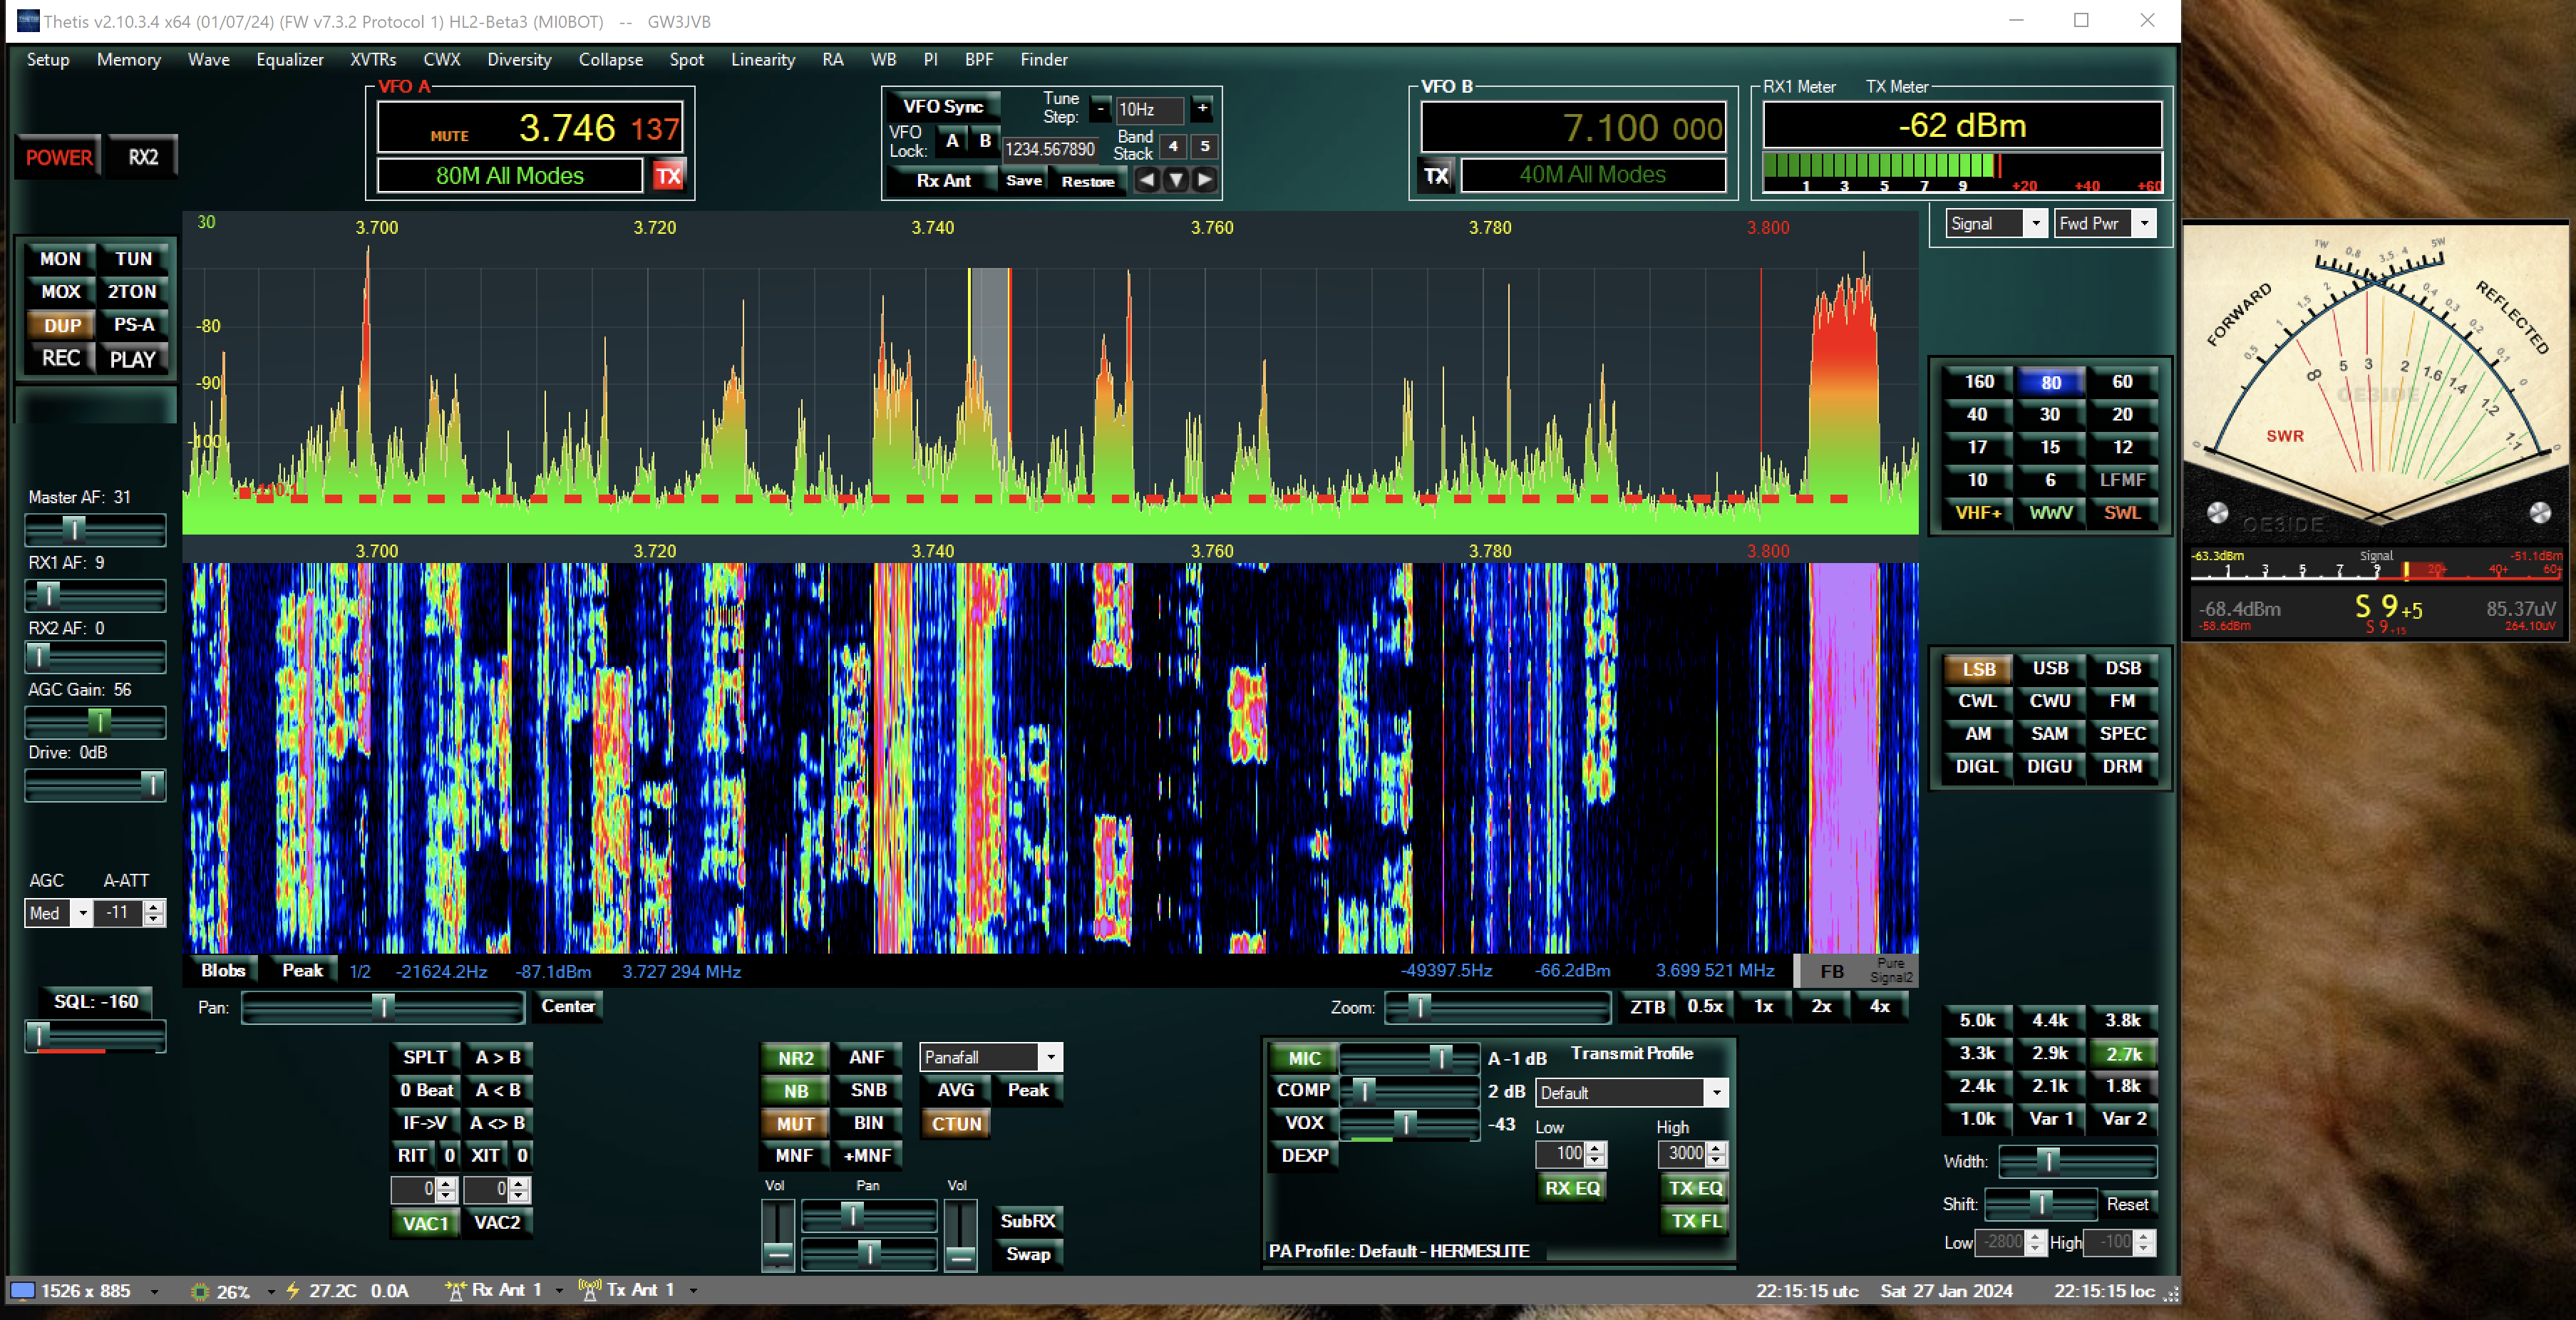
Once you have the correct HL2 version of Thetis installed, power and ethernet connected ready to go, you can launch the Thetis application. Something that I haven’t seen documented elsewhere is that on 1st launch, Thetis runs through what can appear as a lengthy (≅5 minutes) process, it can be seen on screen but simply let it do what it needs to do, it is a one time thing and is not an issue.
Obtaining Your IP Address

For users running HL2 on native Windows, Thetis automatically obtains the IP address. For users on Mac running Windows in a VM in parallels, this isn’t the case and you may need to obtain the IP address of your HL2 from the router on your home network. I logged into my router and looked for the connected devices in the DHCP list. You will likely need to do the same.
Note: there are many types of routers and the menu system is different in each. Refer to your service provider for instructions as to how to log into your router. I obtained and confirmed my HL2 IP address by checking the DHCP list with the ethernet cable connected , then refreshing the list with it not connected. (I have greyed out my IP address in the image above.). Make sure you then enter this IP address in Thetis.
Important: Required Version of Parallels
On native Windows systems (not Windows in a VM in Parallels), when you press the ‘Power’ button in Thetis, it should automatically identify the HL2 on your network and everything should kick into life. However, on my iMac running Parallels for Mac Standard edition, it was not automatically identified. This is where some experimentation commenced!
NOTE 1: Parallels for Mac Standard edition doesn't natively forward UDP ports from the host network to the Virtual Machine.  For this you need Parallels for Mac Pro edition.

NOTE 2: If you are attempting this using a Mac computer that has Apple Silicon, you will need to be using Windows 11.

Parallels doesn’t natively forward UDP ports from the host network to the VM, so for this to work on my Mac, I needed to upgrade my version of Parallels for Mac Standard edition, to Parallels for Mac Pro edition – which – you’ve guessed it – allows you to setup port forwarding. I set up the Parallels UDP port forwards to Windows 10 for each of the ports 1024, through to 1028. Here is the official Parallels knowledge base article explaining how to do this, and the image here shows what I see on my iMac when I set it up; simply set the following;
- Protocol: UDP
- Source port: 1024
- Forward to: Windows 10 (or your version of Windows, mine is 10)
- Destination port: 1024
…then press OK. Repeat this for each port from 1024, through 1028.
Additionally, I had to ensure Limit to Subnet was not checked (see image above). In Ricks article however, it is checked. Your configuration may differ, if you are having difficulty simply try these alternate settings.
NOTE: The reason to uncheck 'Limit to Subnet' is that Parallels assigns an IP with a different subnet to the one that the Hemes Lite 2 obtained from the LAN's DHCP server.  With some investigation Windows 10 and/or Parallels could be configured to obtain an IP from the LAN's DHCP server which would remove the need to use this option, but I have not investigated this option.

I searched for the mac address in the DHCP list to obtain the IP that had been given to the Hermes Lite 2. The mac address started with 00:1C:C0:A2 in my case.
After carrying out all the above, as soon as I unchecked the Limit to Subnet tick box and pressed the Power button in Thetis, my Hermes Lite 2 sprang to life! If you have any questions, think I have missed something, or you spot glaring errors in my document, please do get in touch via my email, which is gw3jvb at gmail dot com.
Thanks also to Richie MW0LGE, Steve GW4OGO, Gareth MW1DCF and Andy M7SBC for their help.
Thanks for reading.
John. 73